-
Created by
 BlakBat, last updated about 7 hours ago
4 minute read
BlakBat, last updated about 7 hours ago
4 minute read
Requirements
- Git: used to upload and update your nwsync files. Command lines are given below; a graphical client such as TortoiseGit works too.
- A GitLab account: sign up at https://gitlab.com/users/sign_up if you don’t have one.
- There is a 10gb limit per repository on GitLab, so your total hak pack content must be less than 10gb.
Create your GitLab project
- Log in to GitLab.
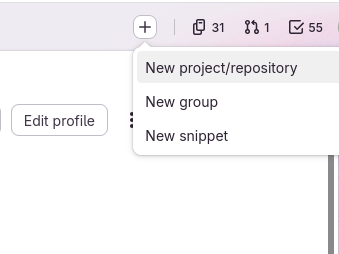
- Click the + in the top-right corner, then New project/repository.
- Select Create blank project (GitLab documentation).
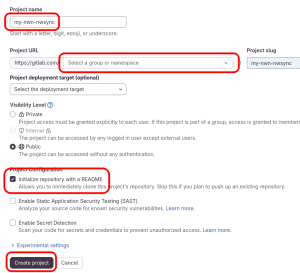
- Choose a project name and a visibility level, then click Create project.
Set up your project from the template
You will clone the template project, then configure it to become your project.
- Clone the template into a folder of your choice:
git clone https://gitlab.com/nwn.ovh/nwn-gitlab-nwsync.git my-nwsync
cd my-nwsync
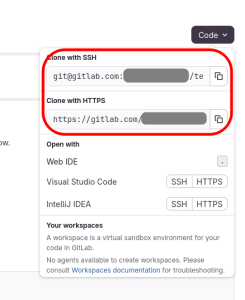
- Point it to your own project. On your project page, click the Code button and copy the URL. If you don’t have an SSH key (or don’t know what it is), use Clone with HTTPS.
git remote set-url origin <your-project-url>
- With TortoiseGit: right-click the folder, choose TortoiseGit → Settings → Git → Remote, select
origin, replace the URL, then click OK. - Configure the module name. Open the
configurationfile and replacefoobarwith your module’s name:
# Change the 'foobar' values below
MODULE_NAME=MyModule
Don’t use spaces in the name. The CI script doesn’t quote it, so a name with spaces breaks the build.
- Add your HAK files. Copy your
.hakand.tlkfiles into thehaks/folder, then delete the placeholderhaks/empty.hak. You don’t need to generate the nwsync files yourself. On every push, GitLab CI runsnwsync_writeon everything inhaks/and publishes the result to GitLab Pages. - Commit and push to your project:
git add -A
git commit -m "Add nwsync files"
git push -u origin main
If the push is rejected, your project was probably created with a README. Overwrite it with:
git push -u --force origin main
If the push is still rejected, verify that you are trying to push to your repository, and not the template. Also check your credentials or ssh key.
Enable GitLab pages
- In your project, go to Settings → General, and expand Visibility, project features, permissions.
- Make sure Pages is turned on. Set its access level to Everyone: players’ game clients download the files without logging in, so any other setting blocks them.
- Click Save changes.
Run the pipeline
The push in section 2 has already started a pipeline. To run one manually, for example after changing a setting:
- Go to Build → Pipelines and click Run pipeline.
- Leave the branch on
mainand click Run pipeline. - Wait for the pipeline status to become Passed. It runs a
pagesjob, which builds the nwsync data, followed by apages:deployjob, which publishes it.
If the pipeline doesn’t start, or asks you to verify your account, GitLab requires identity verification before free accounts can use its shared runners. Follow the prompt, then run the pipeline again.
Get your nwsync URL
- Go to Deploy → Pages. Your site URL is shown there.
- By default, GitLab gives a unique URL such as
https://<project-name>-<random>.gitlab.io. - For a readable URL such as
https://<username>.gitlab.io/<project-name>, untick Use unique domain and save. (optional)
- By default, GitLab gives a unique URL such as
- Check that the deployment worked by opening
<your-url>/latestin a browser. It should display a short string of letters and digits, which is the identifier of your current manifest. - Use this URL as the nwsync URL in your server configuration.
Notes
- Pages turns on by itself: you don’t add any Pages configuration. GitLab deploys automatically because the template’s CI job is named
pagesand outputs apublic/folder. - Changing the unique-domain setting changes your URL. Pick one before giving the URL to players or putting it in your server configuration.
Caveats
- There is a 10gb limit per repository on GitLab. For this reason, it's advised to always
git amendyour last commit in order to rewrite the history and not make the repository grow in size.